In the city of Seattle, where space is a premium commodity, homeowners and interior designers are constantly on the lookout for innovative solutions that maximize functionality without compromising aesthetics. One such solution that has gained significant popularity in recent years is the installation of sliding shower doors. These space-saving marvels not only enhance the visual appeal of bathrooms but also offer practical benefits such as efficient space utilization and ease of maintenance.
This comprehensive guide delves into the world of sliding shower doors, exploring different types, installation processes, cost considerations, and the best practices for selecting the right doors for your space in Seattle, WA.
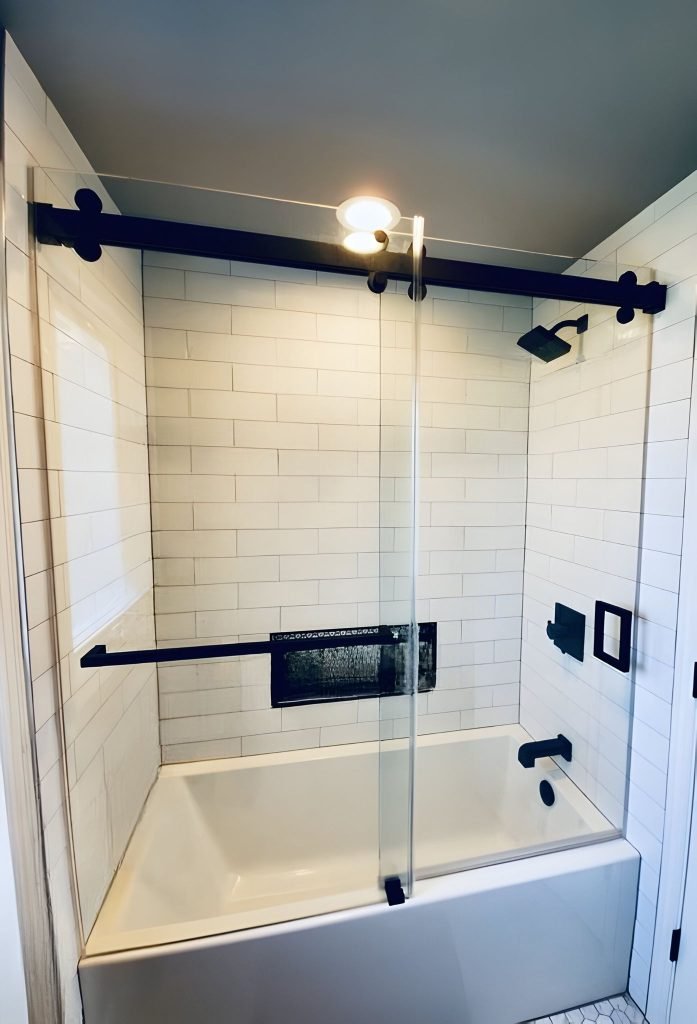
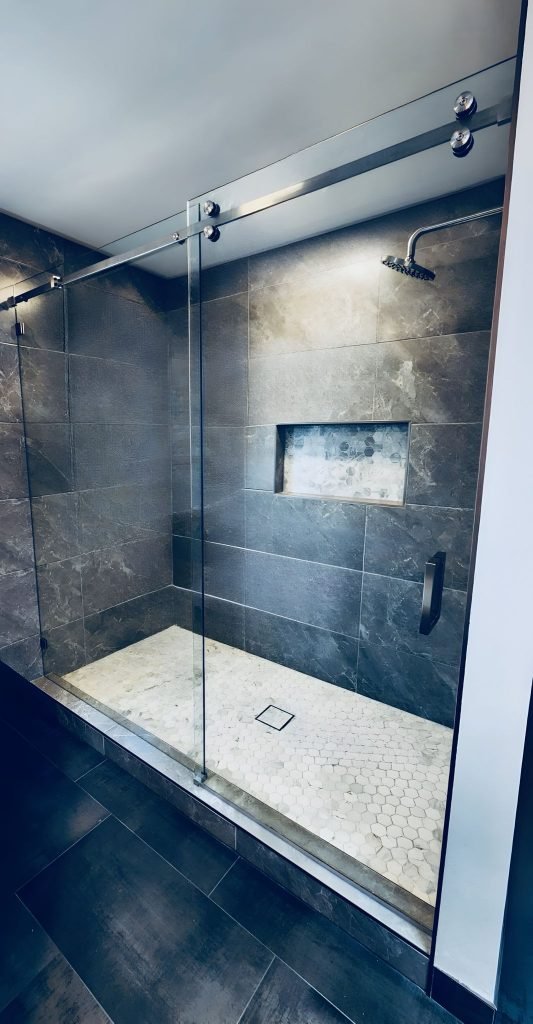
Sliding shower doors, also known as bypass doors, are a contemporary alternative to traditional hinged doors. They operate on a track system, allowing them to slide open and closed effortlessly. This design eliminates the need for outward swinging doors, making sliding shower doors an ideal choice for bathrooms with limited space.
Types of Sliding Shower Doors
Frameless Sliding Shower Doors:
Frameless sliding shower doors are the epitome of elegance and modernity. They feature minimalistic hardware and a seamless glass panel that creates a spacious and open feel in any bathroom. In Seattle, WA, where residents appreciate sleek design elements, frameless sliding shower doors are a popular choice.Cost Analysis: The average cost for frameless sliding shower doors in Seattle ranges from $0.69 to $0.99 per inch, with prices varying based on dimensions and customization options.
Double Sliding Shower Doors:
Double sliding shower doors consist of two panels that slide past each other, providing a wider opening for entry and exit. This design is ideal for larger bathrooms or shower enclosures where accessibility is a priority.Cost Analysis: The cost of double sliding shower doors in Seattle typically ranges from $0.63 to $1 per inch, depending on the quality of materials and additional features.
Benefits of Sliding Shower Doors:
Space Efficiency: Sliding shower doors are perfect for compact bathrooms as they do not require extra space for door swing, maximizing the available floor area.
Aesthetic Appeal: The seamless and sleek design of sliding shower doors adds a touch of sophistication to any bathroom décor, making them a sought-after choice among homeowners in Seattle.
Easy Maintenance: With fewer components and no hinges to clean, sliding shower doors are easy to maintain and keep looking pristine over time.
Installation Process
Measurement and Customization: The first step in installing sliding shower doors is accurate measurement. Professional installers in Seattle take precise measurements to ensure a perfect fit. Customization options, such as glass thickness and hardware finishes, are also discussed during this stage.
Preparation of the Space: Before installation, the shower area is prepared by cleaning the walls and ensuring they are plumb and square. Any necessary adjustments or repairs are made to create a suitable environment for the sliding doors.
Installation of Tracks and Panels: The tracks for the sliding doors are installed securely, followed by the placement of the glass panels. Seals and gaskets are added to prevent water leakage and ensure a watertight enclosure.
Final Adjustments and Testing: Once the doors are in place, the installers make final adjustments to ensure smooth operation and proper alignment. A thorough testing process is conducted to check for any issues and ensure customer satisfaction.
Cost Considerations
The cost of sliding shower doors in Seattle depends on several factors, including:
Type of Doors: Frameless doors generally cost more than framed or semi-frameless options due to their premium design and materials.
Size and Customization: Larger doors or custom-designed doors may incur additional costs.
Installation Charges: Professional installation services contribute to the overall cost but ensure precise fitting and optimal performance.
Choosing the Right Sliding Shower Doors
When selecting sliding shower doors for your Seattle home, consider the following factors:
Space Constraints: Measure your shower area accurately to determine the maximum door size that fits comfortably without obstructing other bathroom elements.
Design Preferences: Decide whether you prefer frameless, semi-frameless, or framed doors based on your aesthetic preferences and budget.
Quality and Durability: Opt for doors made from high-quality materials such as tempered glass and corrosion-resistant hardware for long-lasting performance.
Professional Installation: Choose reputable installers in Seattle with experience in installing sliding shower doors to ensure a seamless and hassle-free process.
How to Install a Sliding Shower Door
Installing a sliding shower door requires precision and attention to detail. Here are the basic steps to guide you through the installation process:
Measurements and Preparation: Measure the width of the shower opening accurately to ensure the door fits perfectly. Prepare the area by cleaning the walls and ensuring they are plumb and level.
Attach Bottom Track: Install the bottom track along the shower threshold, making sure it is level and securely anchored. Use the provided screws or adhesive to fix the track in place.
Mount Side Jambs: Attach the side jambs to the walls on either side of the shower opening. Ensure they are vertical and aligned with the bottom track.
Hang Doors on Rollers: Place the doors onto the rollers in the bottom track. Adjust the rollers to achieve smooth and effortless sliding motion.
Install Top Track: Fix the top track above the doors, ensuring it is level and securely fastened to the walls. Some designs may require additional hardware for stability.
Add Door Handles and Seals: Install the door handles according to the manufacturer’s instructions. Attach seals or gaskets along the edges of the doors to prevent water leakage.
Test Operation: Test the doors to ensure they slide smoothly without any obstructions. Make any necessary adjustments to the rollers or tracks for optimal performance.
Final Checks: Check for gaps or uneven alignment and make final adjustments as needed. Seal any gaps between the door and walls to prevent water seepage.
By following these steps carefully and referring to the specific instructions provided with your sliding shower door kit, you can successfully install a sliding shower door in your bathroom.

How to Fix Sliding Shower Door Bottom Guide
If your sliding shower door’s bottom guide is damaged or malfunctioning, follow these steps to fix it:
Identify the Issue: Determine the specific problem with the bottom guide, such as wear and tear, misalignment, or broken parts.
Remove the Door: Lift the sliding door off the bottom track and set it aside safely.
Inspect the Bottom Guide: Examine the bottom guide for any visible damage or issues. Clean it thoroughly to remove dirt or debris that may be causing the problem.
Replace or Repair: Depending on the extent of damage, you may need to replace the bottom guide with a new one. Alternatively, you can repair minor issues by tightening screws, realigning the guide, or replacing worn-out parts.
Reinstall the Door: Once the bottom guide is fixed or replaced, reinstall the sliding door onto the bottom track. Test its operation to ensure smooth sliding motion without any issues.
Adjust if Necessary: Make any necessary adjustments to the door’s alignment or the bottom guide to optimize performance and prevent future problems.
By addressing issues with the sliding shower door’s bottom guide promptly, you can ensure smooth operation and prolong the lifespan of your shower door system.
How to Remove Sliding Shower Door
If you need to remove a sliding shower door for maintenance or replacement, follow these steps:
Lift Off the Doors: Lift the sliding door panels upward to disengage them from the bottom track. Some doors may have a release mechanism that needs to be activated to remove them.
Remove Top Track: Unscrew or detach the top track from the walls or ceiling, depending on the design. Use a screwdriver or appropriate tools to loosen and remove the track.
Take Out Bottom Track: Lift the bottom track off the shower threshold, ensuring it is clear of any screws or adhesive holding it in place.
Clean and Prepare: Clean the area where the sliding doors were installed, removing any dirt, grime, or adhesive residue. Ensure the walls and floor are ready for reinstallation or replacement.
Store Doors Securely: If you plan to reinstall the doors later, store them in a safe and secure location to prevent damage.
By following these steps, you can safely and effectively remove a sliding shower door without causing damage to the surrounding area.
How to Clean Overlapping Sliding Shower Doors
Cleaning overlapping sliding shower doors requires attention to detail to ensure a sparkling and streak-free finish. Here’s how to do it effectively:
Gather Supplies: Collect cleaning supplies such as a mild detergent or glass cleaner, a sponge or microfiber cloth, and a squeegee.
Preparation: Rinse the doors with warm water to remove surface dirt and soap residue. Avoid using abrasive cleaners or tools that could scratch the glass.
Apply Cleaner: Spray a generous amount of the chosen cleaner onto the glass surface. Ensure it covers the entire area, including any overlapping sections.
Scrub and Wipe: Use a sponge or cloth to scrub the glass gently, focusing on areas with buildup or water stains. Wipe the cleaner off with a clean, damp cloth.
Squeegee and Dry: Use a squeegee to remove excess water and cleaner from the glass, starting from the top and working downward. This prevents streaks and water spots.
Detailing: For a polished finish, use a dry microfiber cloth to buff the glass and remove any remaining moisture or streaks.
Clean Tracks and Hardware: Don’t forget to clean the tracks, guides, and hardware associated with the sliding doors. Use a toothbrush or small brush to reach tight spaces.
Final Inspection: Inspect the doors for any missed spots or streaks. Touch up as needed for a flawless appearance.
Regular cleaning and maintenance of overlapping sliding shower doors not only enhance their appearance but also prolong their lifespan and functionality.
How to Adjust Sliding Shower Doors
If your sliding shower doors are not operating smoothly or are misaligned, you can adjust them using the following steps:
Identify the Issue: Determine whether the doors are sticking, dragging, or misaligned. Inspect the tracks, rollers, and guides for any visible problems.
Loosen Screws: Most sliding shower doors have adjustment screws on the rollers or tracks. Loosen these screws slightly to allow for movement.
Adjust Rollers: Use a screwdriver or Allen wrench to adjust the rollers. Turn the adjustment screws clockwise or counterclockwise to raise or lower the doors as needed.
Check Alignment: Ensure the doors are parallel and evenly spaced within the tracks. Make adjustments to the rollers on both sides to maintain proper alignment.
Tighten Screws: Once the doors are properly aligned and moving smoothly, tighten the adjustment screws securely to lock the position in place.
Test Operation: Slide the doors back and forth to test their operation. They should glide effortlessly without sticking or catching on the tracks.
Fine-Tune if Necessary: Make minor adjustments as needed to achieve optimal performance and alignment.
Regularly adjusting sliding shower doors ensures they function properly and minimizes wear and tear on the tracks and rollers.
How to Remove Overlapping Sliding Shower Doors
Removing overlapping sliding shower doors requires careful handling to avoid damage. Follow these steps to remove them safely:
Open Doors: Slide the doors to one side to create an opening. If they overlap in the center, open them partially to access the screws and hardware.
Remove Screws: Locate the screws or fasteners securing the overlapping panels. Use a screwdriver or appropriate tool to loosen and remove these screws.
Separate Panels: Once the screws are removed, carefully lift one panel of the sliding doors to disengage it from the overlapping section.
Detach Bottom Guide: If the doors have a bottom guide, detach it from the bottom track by lifting it upward or sliding it out of the track.
Remove Top Track: Unscrew or detach the top track from the walls or ceiling. Remove any screws or hardware securing it in place.
Lift Out Panels: With the tracks and guides removed, lift the remaining panel(s) out of the bottom track. Handle them carefully to avoid breakage or damage.
Clean and Prepare: Clean the area where the doors were installed, removing any debris, adhesive residue, or dirt. Prepare the space for reinstallation or replacement if needed.
By following these steps, you can safely remove overlapping sliding shower doors and prepare the area for maintenance, renovation, or new installations.