AQ Glass

When it comes to upgrading your bathroom, choosing the right shower door is a critical decision. Among the various options available, framed shower doors in Seattle, WA stand out for their durability, affordability, and classic look. For homeowners in Seattle, framed shower doors offer a practical and stylish solution that can complement a wide range of bathroom designs. This comprehensive guide explores the pros and cons of framed shower doors to help you decide if they are the right choice for your Seattle home.

Understanding Framed Shower Doors

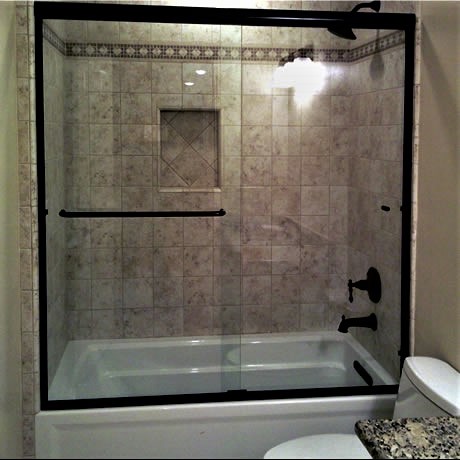
Framed shower doors are characterized by a metal frame that surrounds the glass panels. This frame is usually made from aluminum or another sturdy metal, providing structural support and durability. These doors are available in several styles, including sliding, pivot, and bi-fold designs, allowing for flexibility in bathroom layouts and personal preferences.

Pros of Framed Shower Doors

Cost-Effective Framed shower doors are generally more affordable compared to frameless options. The robust frame provides additional support, which can reduce manufacturing costs. This makes framed shower doors for sale an attractive option for budget-conscious homeowners in Seattle.

Durability The metal frame around the glass panels adds an extra layer of durability, making these doors less susceptible to breakage. This is particularly beneficial for high-traffic bathrooms or homes with children, as it provides added safety.

Ease of Installation Installing framed shower doors is typically easier and quicker than installing frameless doors. The frame provides a guide, making it easier to align and secure the door properly. This can result in lower installation costs and a quicker turnaround time, making it convenient for those looking to install framed shower doors.

Water Containment Framed shower doors excel at containing water within the shower enclosure. The frame helps to create a seal, reducing the chances of water leaking onto the bathroom floor. This feature helps keep your bathroom dry and minimizes the risk of water damage.

Versatile Design Options These doors come in a variety of styles and finishes, allowing you to choose a design that complements your bathroom decor. Whether you prefer a classic chrome finish or a more modern black frame, you can find framed shower doors that fit your aesthetic.

Stability The frame provides added stability to the glass panels, reducing the likelihood of wobbling or shifting over time. This stability can enhance the overall safety and functionality of the shower door, particularly in busy households.

Cons of Framed Shower Doors

Maintenance The metal frames can accumulate soap scum, mold, and mildew over time, requiring regular cleaning and maintenance. The crevices in the frame can be difficult to clean thoroughly, which may lead to hygiene concerns if not properly maintained. For instance, a framed shower door seal strip can trap moisture and grime, necessitating frequent cleaning.

Bulkier Appearance Framed shower doors have a bulkier appearance compared to frameless doors. This can make the bathroom look smaller and less open, which may not be ideal for those who prefer a more modern and minimalistic design.

Limited Customization While there are various styles and finishes available, framed shower doors offer less customization compared to frameless doors. If you have a specific design vision in mind, you might find the options somewhat limited.

Potential for Corrosion Although many framed shower doors are made with corrosion-resistant materials, there is still a potential for rust and corrosion over time, especially in the humid environment of a bathroom. This can affect the door’s appearance and functionality.

Replacement Challenges If a glass panel in a framed shower door breaks, replacing it can be more challenging than with frameless doors. The frame may need to be disassembled, which can be time-consuming and potentially costly.

Types of Framed Shower Doors

1. Framed Pivot Shower Door

A pivot shower door operates on a hinge that allows the door to swing open and closed. This type of door is ideal for bathrooms with enough space to accommodate the door’s swing radius. Framed pivot shower doors provide a secure and stable option with easy access.

2. Framed Sliding Shower Door

Sliding shower doors, also known as bypass doors, slide past each other on tracks. This type of door is perfect for bathrooms with limited space, as it does not require any clearance to swing open. Sliding framed shower doors offer convenience and functionality without compromising on style.

3. Framed Corner Shower Door

Corner shower doors are designed to fit into the corner of a bathroom, making them a great option for smaller spaces. They typically feature a combination of sliding and pivot doors to maximize accessibility and use of space. Framed corner shower doors are a popular choice for compact bathroom designs.

Framed Shower Doors Seattle
AQ Glass Framed Shower Door

Installation and Maintenance Tips

1. How to Install a Framed Shower Door

Installing a framed shower door involves several steps, including measuring the shower opening, assembling the frame, and securing the door in place. It’s important to follow the manufacturer’s instructions carefully to ensure a proper fit and secure installation. If you’re not confident in your DIY skills, consider hiring a professional to install your framed shower door.

2. Replacing Framed Shower Door Parts

Over time, certain parts of a framed shower door may wear out and require replacement. Common components that may need replacing include the framed shower door seal strip, drip rail, and bottom seal strip. Regular inspection and maintenance can help prolong the lifespan of your shower door.

3. Dealing with Leaks

Leaks are a common issue with framed shower doors, particularly around the seals and frame joints. If you notice water leaking from your shower door, inspect the seals and replace any damaged or worn components. Ensuring the door is properly aligned and secured can also help prevent leaks.

Comparing Framed and Frameless Shower Doors

The choice between framed shower doors vs frameless doors often comes down to personal preference and budget. Here’s a quick comparison to help you decide:

Aesthetic: Frameless doors offer a sleek, modern look, while framed doors have a more traditional appearance.

Cost: Framed doors are generally more affordable than frameless doors.

Maintenance: Frameless doors are easier to clean but may require more careful handling to avoid damage.

Durability: Framed doors are typically more durable due to the added support of the frame.

How to Replace a Framed Shower Door Seal Strip

Replacing the seal strip on a framed shower door is a straightforward process that helps prevent water leaks and maintains the functionality of your shower. Follow these steps to replace the seal strip effectively:

Identify the Type of Seal Strip:

Determine the type of seal strip used in your shower door. Common types include bottom sweeps, side seals, and top seals. Make sure to purchase the correct replacement seal that matches the existing one.

Remove the Old Seal Strip:

Open the shower door to access the seal strip.

Gently pull the old seal strip off the door frame. Some strips might slide off easily, while others might require a bit of force.

If the strip is secured with adhesive, use a utility knife to cut through the adhesive and remove the strip.

Clean the Surface:

Clean the area where the old seal strip was attached using a mild cleaner and a cloth. Ensure that the surface is free of dirt, soap scum, and adhesive residue. A clean surface ensures better adhesion for the new seal strip.

Measure and Cut the New Seal Strip:

Measure the length of the old seal strip and cut the new one to match. Use scissors or a utility knife for precise cutting.

If the new seal strip is too long, trim it to fit the door frame properly.

Install the New Seal Strip:

Align the new seal strip with the door frame.

Slide or snap the new seal strip into place, depending on the design of your shower door. Ensure it fits snugly and covers the gap effectively.

For adhesive-backed strips, remove the backing and press the strip firmly onto the door frame. Make sure it adheres well.

Test the Seal:

Close the shower door and check for any gaps or leaks. If the seal strip is not properly aligned, adjust it as needed.

Run water along the edges of the door to ensure the new seal strip is effectively preventing leaks.

Regular Maintenance:

Periodically check the seal strip for wear and tear.

Clean the seal strip regularly to prevent the buildup of soap scum and mildew, which can degrade the material over time.

Replacing a framed shower door seal strip is a simple yet essential maintenance task that helps keep your bathroom dry and clean. By following these steps, you can ensure a proper seal and extend the life of your shower door.

Affordable framed shower door seattle
Aq glass Framed shower doors seattle,

How to Install a Framed Shower Door

Installing a framed shower door requires careful measurement and alignment to ensure a secure and leak-free fit. Here’s a step-by-step guide to help you with the installation process:

Measure the Shower Opening:

Measure the height and width of the shower opening to ensure that the door fits properly.

Verify that the walls are plumb and the shower base is level.

Prepare the Door Components:

Unpack the shower door components and lay them out.

Identify all parts and hardware, including the frame, door panels, screws, and tracks.

Install the Bottom Track:

Place the bottom track along the shower base.

Use a pencil to mark the positions for drilling holes.

Drill the holes and secure the bottom track with screws. Ensure the track is level.

Attach the Side Frames:

Align the side frames with the bottom track and mark the drilling positions on the walls.

Drill the holes and insert wall anchors if needed.

Secure the side frames with screws, ensuring they are plumb.

Install the Top Frame:

Position the top frame on top of the side frames.

Secure it with screws, ensuring all parts are aligned and the frame is square.

Install the Door Panels:

Attach the hinges or rollers to the door panels according to the manufacturer’s instructions.

Hang the door panels on the frame, ensuring they are level and operate smoothly.

Adjust the position of the panels if necessary to ensure proper alignment and smooth operation.

Install the Door Handles and Seals:

Attach the door handles according to the manufacturer’s instructions.

Install any seal strips or sweeps to prevent water leakage.

Seal the Edges:

Apply silicone sealant along the edges of the frame to prevent water from leaking out.

Allow the sealant to cure for at least 24 hours before using the shower.

Test the Installation:

Open and close the shower door to ensure it operates smoothly and seals properly.

Check for any gaps or leaks and adjust if necessary.

Installing a framed shower door can be a rewarding DIY project. By following these steps, you can achieve a professional-looking installation that enhances the functionality and aesthetics of your bathroom.

How to Replace Framed Shower Door Sweep

Replacing a framed shower door sweep helps to maintain a watertight seal and prevent leaks. Here’s a step-by-step guide to replacing the sweep:

Remove the Old Sweep:

Open the shower door to access the sweep.

If the sweep is attached with screws, remove them using a screwdriver.

If the sweep is snapped or slid into place, gently pull it off the door.

Clean the Surface:

Clean the bottom edge of the shower door where the sweep was attached.

Remove any dirt, soap scum, or adhesive residue to ensure a clean surface for the new sweep.

Measure and Cut the New Sweep:

Measure the length of the old sweep and cut the new sweep to match.

Use scissors or a utility knife for a precise cut.

Attach the New Sweep:

Align the new sweep with the bottom edge of the door.

Slide or snap the new sweep into place, depending on its design.

If the sweep is attached with screws, align the holes and secure it with the screws.

Test the Seal:

Close the shower door and check for any gaps or leaks.

Ensure the sweep is making proper contact with the shower base.

Adjust if Necessary:

If the sweep is not sealing properly, adjust its position.

Ensure that it is evenly aligned and providing a watertight seal.

Replacing a framed shower door sweep is a simple task that helps to maintain the functionality and efficiency of your shower door. By following these steps, you can ensure a proper seal and prevent water from leaking out of your shower.

Final Comments

Choosing the right type of shower door for your Seattle home involves considering various factors such as budget, design preferences, and maintenance requirements. Framed shower doors offer a durable, cost-effective, and versatile option that can complement a wide range of bathroom styles. By weighing the pros and cons and understanding the different types of framed shower doors available, you can make an informed decision that meets your needs and enhances your bathroom’s functionality and aesthetic appeal.

Leave a Reply

Your email address will not be published. Required fields are marked *